Junk Drawer
Organ Donation
Are you an organ recipient or a donor family?
I would love to hear from you and maybe even publish your transplant tale on my blog. Get in touch.
Want to know more about organ donation?
Visit Donate Life America for information.
Want to hear Jill’s real life story about a teen heart recipient and her donor family?
Click here for Jill’s “This American Life” episode.
Want to watch a real heart transplant operation?
Click here to watch a transplant operation on YouTube.
Knitting
The Knitting Lady’s Guide to Making a Scarf
(Use yellows and golds if you want your scarf to look like the one that Cal was knitting.)
One of the best things about knitting is that you don’t need much to get started—just two needles and a ball of yarn. Oh yeah, don’t forget some good lighting and your peace of mind.
I recommend starting with some medium-weight yarn. It doesn’t have to be expensive, but wool or a wool blend is good because it stretches, doesn’t fray like cotton and won’t make your hands all sweaty. Start with needles that are at least a size 9. The bigger the needle, the faster the knitting goes, but don’t get something that’s too cumbersome for your hands. I like wooden needles best, but plastic is good too. They don’t get too slick and let stitches slide off when you aren’t looking.
The first step is casting on, which means creating the first row of stitches around the needle. This can be pretty intimidating for a beginner, so try to find someone to do this for you. (It’s lots of fun and you can learn it later.) Ask the person to cast on between 15 and 20 stitches for a scarf, depending on the width you like.
Now, it’s time to knit.
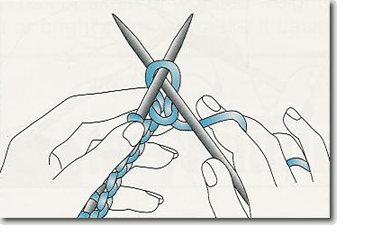
Step 1
In your left hand, hold the needle with the stitches and angle it to the right. With your free hand, insert the tip of the empty needle into the first stitch, from front to back, creating a T with the tips of the needles:
Step 2
Using your right hand, loop the yarn from the ball up and away from you over the front of the right needle. Then bring the yarn to the right and down between the two needles:
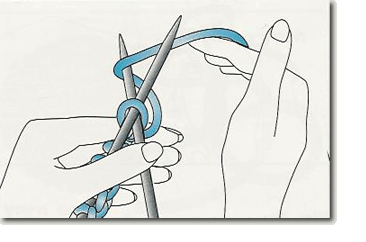
Whew! Got that? It sounds more complicated than it is.
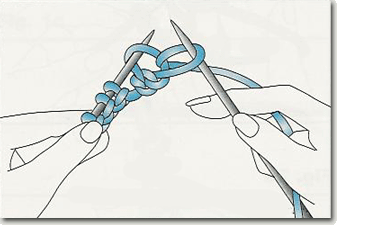
Step 3
Now, while keeping some tension on the wrapped yarn, bring the tip of the right needle (with the wrapped yarn) through the loop on the left needle to the front. Use the tip of your left forefinger on the point of the right needle to guide the stitch:

Is the right needle now in front of the left one? You got it!
Step 4
Almost done. All you have to do is slide the right needle up and to the right until the loop on the left needle drops off and you have a new stitch on the right. Congratulations! You just completed your first knit stitch:
Continue knitting until the left needle is empty and you have a row of gorgeous new stitches on the right needle. Switch hands now—the right needle becomes your left—and start a new row. Keep going until your scarf is the length you like and ask someone to bind off for you. That’s another fun thing you can learn once you become a whiz with the basic stitch.
As you knit, don’t forget to use the Knitting Lady’s mantra:
In through the front door
Run around the back
Peek through the window
Off jumps Jack
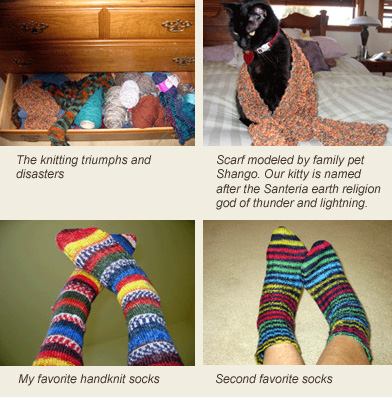
Jill’s Knitting
It’s wonderful! It’s horrible! Here are my personal knitting successes and disasters, plus more yarn than I can use up in two lifetimes: